| SM Publications |
| Silver Salon Forums - The premier site for discussing Silver. |
| SMP | Silver Salon Forums | SSF - Guidelines | SSF - FAQ | Silver Sales |
|
|
|
|
The Silver Salon Forums
Since 1993 Over 11,793 threads & 64,769 posts !! General Silver Forum
|
| REGISTER (click here) |
How to Post Photos
|

|
 SMP Silver Salon Forums SMP Silver Salon Forums
 General Silver Forum General Silver Forum
 Photography Photography
|
 SSFFriend: Email This Page to Someone! SSFFriend: Email This Page to Someone! |
next newest topic | next oldest topic |
| Author | Topic: Photography |
|
tonycooper Posts: 20 |
  
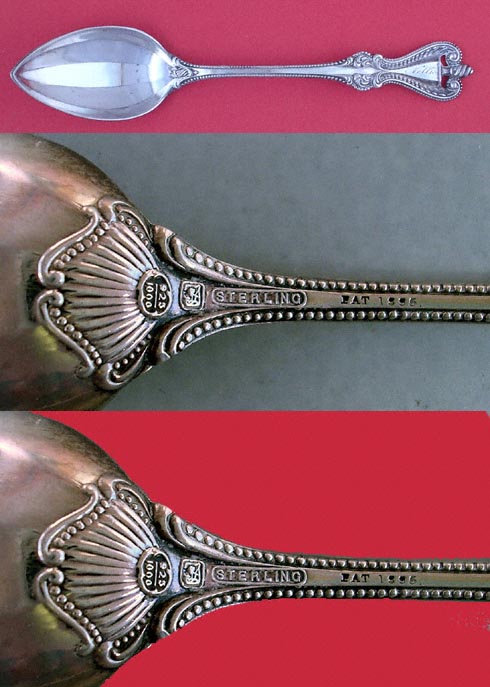
[01-1335] The image in this message is two photos made into one image with Adobe Photoshop. (With a contrasting background thrown in) The Wetzlar spoon image is pretty clear. The Reichsmark crescent moon and crown are clear, and the maker's mark is clear (but I don't know whose it is). The lower image, though, doesn't show the maker's marks clear enough to identify. Now to the question....I've seen some excellent images of hallmarks and maker's marks in this forum. What techniques are being used? I made a crude softbox out of an opaque plastic shoe box with a hole cut in the bottom (it's used with the bottom up) for the lens. This diffuses the light enough to minimize glare spots. I place the item on a piece of silver artboard so I don't get reflective color on the item. (I drop the silver background and replace it with a red fill in Photoshop). I use incandescent lights and the white balance of the camera adjusted to incandescent.
Also, if there's an interest in photographic techniques, I have some suggestions in other areas (making a full-size softbox for under $5.00, for example and what a softbox does for you). I'd like to see a continuing thread on this. Tony IP: Logged |
|
Scott Martin Forum Master Posts: 11520 |
Use of a soft box or something equivalent when photographing silver can significantly improve ones results. Your home made opaque plastic shoe box solution seems to have worked well. I am sure our members would like to know more. Since the subject of making a soft box, other similar things and lighting could become quite large, please start a new topic/thread about your soft box. The subject of photographing silver with a film camera can become as large as a book. When you add in all the additional things that digital photography brings to the subject, it can grow to several volumes. Then if you start adding in personal preferences and digital darkroom imaging techniques (i.e., Photoshop) it can become an ever growing encyclopedia. As a group (SSF members) we should keep our tips and suggestions as simple as possible. If as we delve into this subject there is enough interest we can start a separate Photographing Silver Forum. Let's do our best to keep this subject from getting too technical since most of the forum members' primary interest is in silver and sharing and not photography. BTW, I will most likely be the one to not honor this request so don't hesitate to tell me to simplify. There are many different ways to get better results. For example, the soft box and macro setting was a good start. Your camera is capable of a variety of resolutions up to 2048 x 1536 pixels. Take your macro photo at a higher resolution. If your camera's macro lens setting doesn't get as close as you need then in Photoshop you will have enough image detail to enlarge the mark. Once you have the image looking the way you like in Photoshop you can then scale the image to best fit it's target use. For example on the forums 490 pixels wide at 72 dpi. IP: Logged |
|
swarter Moderator Posts: 2920 |
Your light box works fine as long as the marks are all at the same level and have contrasting dark backgrounds, as in your first photo. There are two shortcomings to this method:
As you redoubtably know, camera shake also contributes to unsharpness, especially at high magnifications and short camera to subject distances. - a tripod (with remote shutter release, as pressing the shutter button directly can cause vibration), fast shutter speed (if adjustable), and/or image stabilization (few cameras have this feature, though) help here. IP: Logged |
|
tonycooper Posts: 20 |
There are many different ways to get better results. For example, the soft box and macro setting was a good start. Your camera is capable of a variety of resolutions up to 2048 x 1536 pixels. Take your macro photo at a higher resolution. That's a good suggestion. IP: Logged |
|
Scott Martin Forum Master Posts: 11520 |
Tony, Let us know how this goes. I look foraward to an example. IP: Logged |
|
tonycooper Posts: 20 |
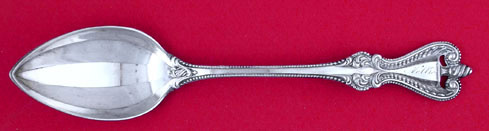
 The above pictures were just taken. I sometimes shoot on a red background, but normally I shoot on a silver background. The top picture of the Towle "Colonial" spoon shows why. See the red reflection on the tip of the spoon bowl? With some items, this becomes a huge problem. Also, the red washes out and there's no consistancy in background. The middle shot is the back of the same spoon shot on a silver background. The lower shot is the middle shot with the silver dropped and replaced with a red fill. This allows me to have a standard background color, and a richer color. I didn't adjust these picture otherwise. Normally, I'd do a little of adjustment in curves to standardize the color of the silver item. I have the advantage of owning Adobe PhotoShop 7 and being fairly proficient at it. I use movable lights so I can change them to oblique lighting when it's called for. A suggestion was made about additional lenses. The Nikon 3100 is a pretty basic and inexpensive digital. It doesn't accept screw-in lenses. The softbox does stabilize the camera. The camera sits in a hole in the lid (and a hole in the other shoebox softbox) so it is in a fixed position. I'm pretty cheap, and I love to fool around with gadgetry. I'd rather make a softbox from found materials. This afternoon I made a light support arrangement out of pvc risers and some modifications to clip on lights. I did increase the resolution for these pictures. It seems to improve the macro shots. Tony IP: Logged |
|
Scott Martin Forum Master Posts: 11520 |
They look great! IP: Logged |
|
Paul Lemieux Posts: 1792 |
Tony, welcome to the SSF forums. I have a couple of suggestions for your photographs. In terms of the pictures of the Towle spoon's marks...I prefer the first one, with a gray background. In the second one, with the red fill added, the edges of the spoon look off because of the way the program fills in colors. The edge of the spoon has a sort of "cut out with scissors" look. The picture you showed us in your first post has a similar effect. (By the way, the trademark on the lower item in the picture is that of the Chas M. Robbins Co.). If you prefer a red background (for example to create more contrast), I would suggest using an actual red backdrop as you have with the picture of the whole Towle spoon. In that image, as you mentioned, the color looks washed out and there are some undesirable colors reflected in the silver (the red spot in the tip of the bowl, as well as an overall bluish tint on the spoon). I used Photoshop 7 to fix these problems. Here is the original image: And here is my edit: Since this isn't a photography forum I do not want to go into a step by step with a lot of technical detail. Basically I touched up the image using Photoshop 7's hue, saturation, brightness, and contrast tools. To remove the redness in the bowl's tip, I selected the offending area with the lasso tool and lightened the reds & magentas 90% in that region only. If you (or anybody else) is interested in the specifics feel free to email me. IP: Logged |
|
tonycooper Posts: 20 |
Thanks for the comments, Paul. All the photos were done for this forum, and I just passed the "magic eraser" over the silver to drop it. Quick and dirty. I didn't make an effort to keep the edges sharp. For a "real" image, I'd use the Extract Filter or the Quick Mask. For the red in the bowl, on something that small I'd use the Dodge Tool to desaturate. I will try your technique, though. I don't quite follow it, but I'll experiment. I like a standard red fill (200/40/60) because I often display the images in html tables with several images and I like the background all the same. Tony IP: Logged |
|
tonycooper Posts: 20 |
quote: Thanks! I've been thumbing through Rainwater's Encyclopedia of American Silver Manufacturers trying to spot it, and skipped right over the Robbins listing. Happen to know if Wetzler is the maker of the German spoon, or is Wetzler the seller? IP: Logged |
|
Arg(um)entum Posts: 304 |
Wetzlar is the retailer. The maker is Wilkens. IP: Logged |
|
Scott Martin Forum Master Posts: 11520 |
Everyone may want to review Tony's thread about his new Photography "Soft box". IP: Logged |
|
Kimo Posts: 1627 |
Oblique lighting as Swarter says can be very effective in bringing out worn or low profile features. Experimenting with daylight especially early morning after dawn or evening before sunset can give soft but natural looking results hard to duplicate with artificial lighting. A polarizing filter can reduce reflections from flat shiney areas and increase contrast a bit. Letting your silver tarnish just a bit to cut down on the shineyness can help. Polishing with a very light touch just to clean the highest points while leaving a light tarnish on the lower spots can increase contrast and better highlight details. IP: Logged |
All times are ET | next newest topic | next oldest topic |
  |
|
Ultimate Bulletin Board 5.46a
|
1. Public Silver Forums (open Free membership) - anyone with a valid e-mail address may register. Once you have received your Silver Salon Forum password, and then if you abide by the Silver Salon Forum Guidelines, you may start a thread or post a reply in the New Members' Forum. New Members who show a continued willingness to participate, to completely read and abide by the Guidelines will be allowed to post to the Member Public Forums. 2. Private Silver Salon Forums (invitational or $ donation membership) - The Private Silver Salon Forums require registration and special authorization to view, search, start a thread or to post a reply. Special authorization can be obtained in one of several ways: by Invitation; Annual $ Donation; or via Special Limited Membership. For more details click here (under development). 3. Administrative/Special Private Forums (special membership required) - These forums are reserved for special subjects or administrative discussion. These forums are not open to the public and require special authorization to view or post. |
|
copyright © 1993 - 2022
SM Publications
All Rights Reserved. Legal & Privacy Notices |