|

|
|
| How to Post Photos |
REGISTER (click here)
|
|
|
|
| How to Post Photos |
REGISTER (click here)
|

|
 SMP Silver Salon Forums SMP Silver Salon Forums
 American Sterling Silver American Sterling Silver
 acid etching technique acid etching technique
|
 SSFFriend: Email This Page to Someone! SSFFriend: Email This Page to Someone! |
next newest topic | next oldest topic |
| Author | Topic: acid etching technique |
|
William Hood Posts: 271 |
  
Tiffany's Lap Over Edge flatware, introduced in 1880, is decorated by several different techniques but most commonly by acid etching. There are more than 350 different etched designs known for all the various piece types, most of which are quite complicated. Close inspection of multiple pieces of Lap Over Edge with the same complicated etched design reveals only minor differences among them, indicating that they were not done free-hand; rather, some sort of acid-resistant mask (with the desired design cut out) was employed. The question is: what was the nature of this mask and how was it adhered? Master silversmith Cheryll Greene of California suggests that it would have been applied like a self-adhering frisket, flexible film or decal. But no details are known. There are no surviving Tiffany records dealing with this question. The technical procedures might have been closely guarded trade secrets or common knowledge at the time. Can anyone comment? IP: Logged |
|
wev Moderator Posts: 4121 |
It would have been fairly easy to do photograpically; the technology (in the printing trades) was well established by 1880. IP: Logged |
|
William Hood Posts: 271 |
Correct me if I am wrong, but it is my impression that photoetching produces only INTAGLIO etching. The etching on Lap Over Edge is RELIEF etching. IP: Logged |
|
wev Moderator Posts: 4121 |
Sorry -- the term is the same for both processes in the trade; I meant photo-engraved as for letterpress printing, not intaglio printing. The former uses a film negative, the latter a film positive. The decoration on a lap piece looks just like the 19th century plates I have in my shop. I could, in theory, print from a flattened spoon handle just as I do from them. [This message has been edited by wev (edited 04-15-2006).] IP: Logged |
|
William Hood Posts: 271 |
WEV: Please forgive my lack of technical expertise, but am still confused. Are you saying that the photoetching technique can produce relief etching? And, if so, can you cite me a reference to read up on this subject. Thus far, I have been unsuccessful in locating an understandable history of the photoetching technique. IP: Logged |
|
Scott Martin Forum Master Posts: 11520 |
WEV may want to explain this differently.... It is a positive/negative thing. Lets say the image is X and so the resist is applied (photographically, screened, decal, painted) as a black X on silver. The applied acid will reduce the area around the black X resist. The resist protects the silver from the acid. So when the resist is removed the silver will have a raised X. Use a positive to get the opposite effect. IP: Logged |
|
William Hood Posts: 271 |
WEV: I would be most grateful if you would describe in simple lay terms the step-by-step methodology that would have been used in the 1880s to photoetch a piece of Lap Over Edge. Don't misunderstand my request: I am not hinting that the technique was not used; am just admitting I don't understand the mechanics. IP: Logged |
|
wev Moderator Posts: 4121 |
At a guess, it would first begin by making pattern plates, one for each side and one for each edge (though these may have been done by hand). The plate would start with the handle shape as clear glass and the rest of the plate black. The artist would then paint in black whatever he wanted to be etched away. When the plates were ready, he would get a spoon blank which was basically shaped, but still flat. He coats the handle front with photo-emulsion. The blank is then locked into a jig properly positioned beneath a copy camera stand. The front pattern plate is inserted and the blank exposed. The emulsion that has been exposed to light hardens and becomes fixed, forming an acid proof ground; that which has not can be washed out with water, leaving bare silver. The handle back is then coated and the steps repeated. When all sides have been done, the bowl is coated with ground and touching up is done by hand, if needed. Once all is ready, into the acid for the first bite. After a suitable time, the spoon is taken out and powdered to prevent under-cutting and etched again. The process is continued until the desired depth is achieved. The spoon is then shaped and finished as normal. This could be wildly wrong, of course. IP: Logged |
|
FredZ Posts: 1070 |
It would be helpful to have images of the Tiffany pattern examples posted to make it easier to contribute to this discussion. Some of us have a fair amount of etching experience in both precious and non precious metals and an image could allow us to contribute our exerience and make a better guess as to how it was done. Fred IP: Logged |
|
William Hood Posts: 271 |
Will be traveling for the next couple of weeks. When I get back, will post some photos. IP: Logged |
|
William Hood Posts: 271 |
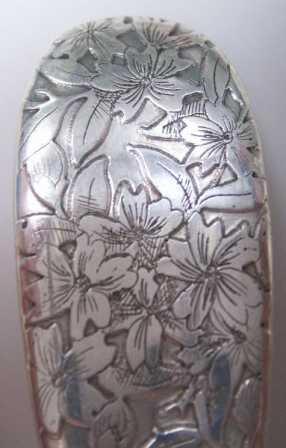
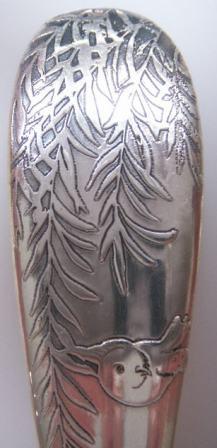
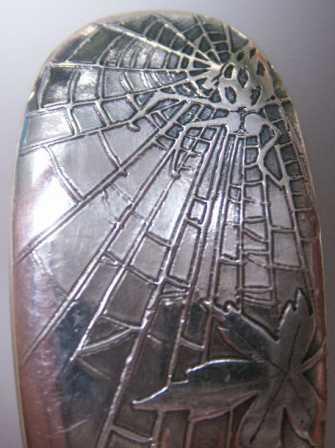
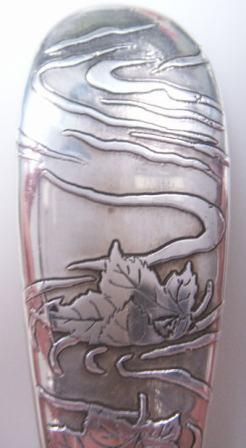
As requested, I am posting below several of the acid-etched decoration designs on pieces in Tiffany's Lap Over Edge pattern. Please comment. Flowers: Willows and birds: Spider in web: Maple leaves and water: IP: Logged |
|
William Hood Posts: 271 |
FredZ, Am disappointed that you and others with expertise in this area have not responded to the pictures posted on April 24 of acid-etched designs on Lap Over Edge flatware. IP: Logged |
|
hello Posts: 200 |
I was watching for the pictures to come, and I too missed it. Am sure others had the same thing. IP: Logged |
|
FredZ Posts: 1070 |
I check it nearly daily and I missed the post with the images until now. The etching would have been done with Nitric acid. A single screen is all that is needed to create the images that you show. The lines on the leaves appear to have been made with a scribe through the resist and then re-etched. They do not appear to have the depth or the typical width that usually occurs when a line is kept in the mordant too long. It would be great to see two examples of the same pattern to see verify that the lines and cross hatching is done by hand. These pieces show the typical signs of etched design. Note the deeper channel next to the raised portions. bubbles often form at these locations and require periodic agitation or feathering to remove the bubbles. The technique is identical as used by Marshall Fields on their bronze desk items and by others for jewelry of the period. (Early 20th century) Fred [This message has been edited by FredZ (edited 05-01-2006).] IP: Logged |
|
William Hood Posts: 271 |
Thanks for your comments, FredZ. I do not own pieces with the same design, but I have a friend who does own some. Will borrow several examples and then post photos. In the meantime, do you agree with the step-by-step process as outlined by wev on April 16? If not, would you please spell-out your concept of the processes involved? IP: Logged |
|
FredZ Posts: 1070 |
William, WEV's description is acurate for the photoetching process. This would be the most practical method to produce multiples of the same design. Much can be learned from looking at multiples of the same item to see what differences occur. I suspect the lines were scratched into the resist. Comparison will help us decide this and possibly us come up with other ideas. It is possible that each of the pieces of flatware were individually painted with resist. This is not very likely unless we see a great variation in designs. (leaf size,added leaf,a stray branch, etc. Fred IP: Logged |
All times are ET | next newest topic | next oldest topic |
  |
|
Ultimate Bulletin Board 5.46a
|
1. Public Silver Forums (open Free membership) - anyone with a valid e-mail address may register. Once you have received your Silver Salon Forum password, and then if you abide by the Silver Salon Forum Guidelines, you may start a thread or post a reply in the New Members' Forum. New Members who show a continued willingness to participate, to completely read and abide by the Guidelines will be allowed to post to the Member Public Forums. 2. Private Silver Salon Forums (invitational or $ donation membership) - The Private Silver Salon Forums require registration and special authorization to view, search, start a thread or to post a reply. Special authorization can be obtained in one of several ways: by Invitation; Annual $ Donation; or via Special Limited Membership. For more details click here (under development). 3. Administrative/Special Private Forums (special membership required) - These forums are reserved for special subjects or administrative discussion. These forums are not open to the public and require special authorization to view or post. |
|
copyright © 1993 - 2022
SM Publications
All Rights Reserved. Legal & Privacy Notices |