|

|
|
| How to Post Photos |
REGISTER (click here)
|
|
|
|
| How to Post Photos |
REGISTER (click here)
|

|
 SMP Silver Salon Forums SMP Silver Salon Forums
 American Sterling Silver American Sterling Silver
 whiting teapot pitcher whiting teapot pitcher
|
 SSFFriend: Email This Page to Someone! SSFFriend: Email This Page to Someone! |
next newest topic | next oldest topic |
| Author | Topic: whiting teapot pitcher |
|
coldair Posts: 18 |
  
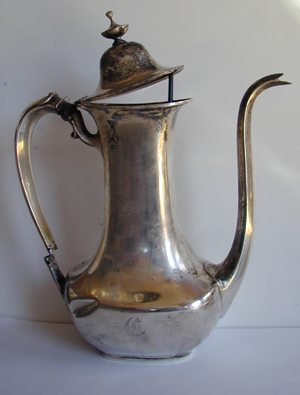
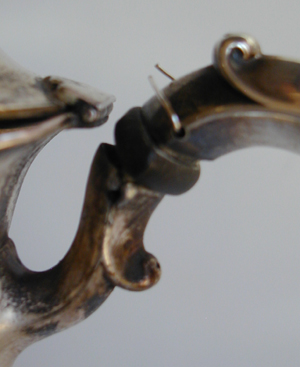
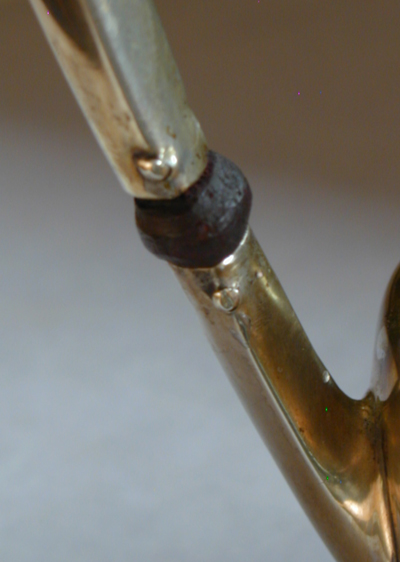
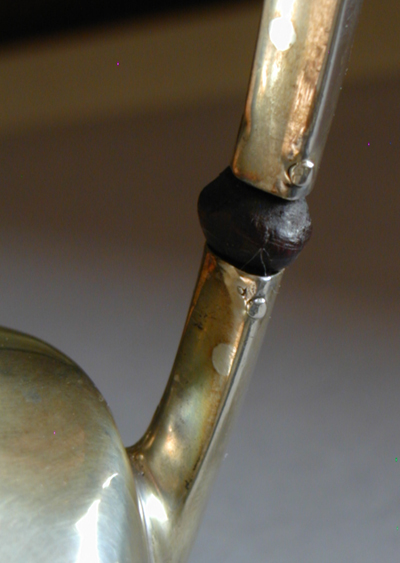
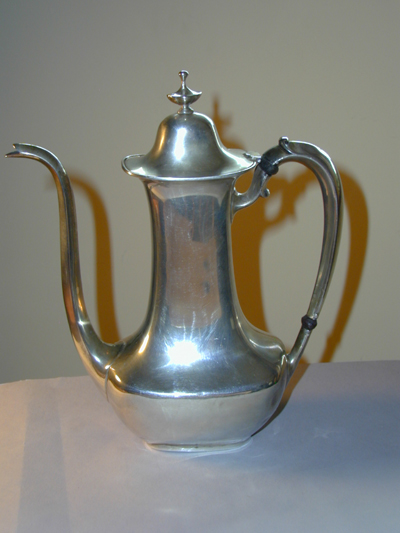
[26-1376] I have an old whiting teapot who's handle is broken - it is separated at two points, and pictures of his similar items show non-sterling pieces joining the handle at those points. Does anyone know what that material usually was - looks like possibly ivory? I'd like to restore the pot. Any tips? IP: Logged |
|
agleopar Posts: 850 |
Coldair, It is possible that they used ivory, or later on, bakelite (sp?) on plated teapots. Any insulating material will do, hard wood, bone, antler, plastic. The trick is to carve the two insulators so that the ends that fit in the teapot and the handle are tight and the 1/8th" that protrudes (a tire shape) is parallel. By that I mean that the handle and the teapot are evenly separated. Start by carving something that looks like a straight piece with a fat tire around its middle. Then start fitting the straight pieces into the ferules and the handle. when you get close even up the tire shape. You might start with a piece an 1 1/4" long by 1/2" or 3/4" square and it could end up 3/4" long by 1/2" where the tire shape is and 3/8ths" in the ferules and handle. That is a rough estimate because I do not know the size you are dealing with, common sence will get you through. After it is a snug fit, it does not have to be perfect (because pinning it will make it tight) but the better the fit the tighter and longer lasting. With the handle on the pot, held tightly, carefully drill the pin holes (it helps to start the holes with a small drill bit to make sure you go through side to side in line) to the size of the existing holes on the ferules and handle. Then using nickle, brass or silver wire the same size as the holes, tapered on one end push them through and trim to 1/16th" either side, then gently rivit over the ends and polish. It can take 3-5 hours depending on variables. Good luck and show us the end result! [This message has been edited by agleopar (edited 03-24-2007).] IP: Logged |
|
coldair Posts: 18 |
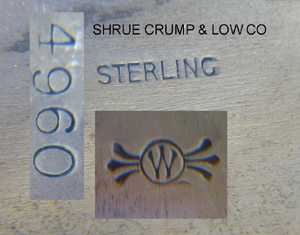
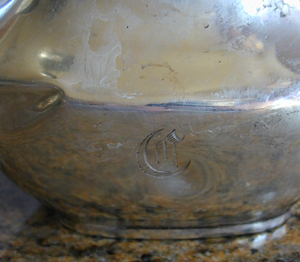
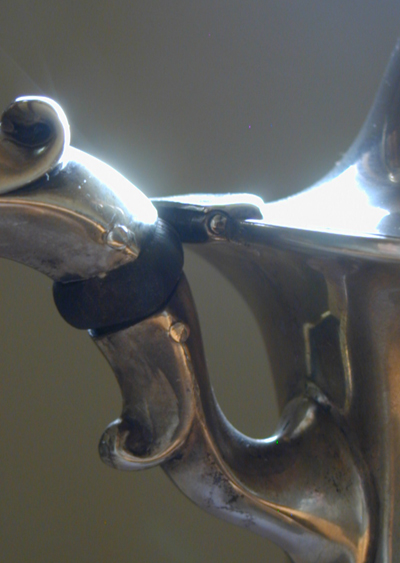
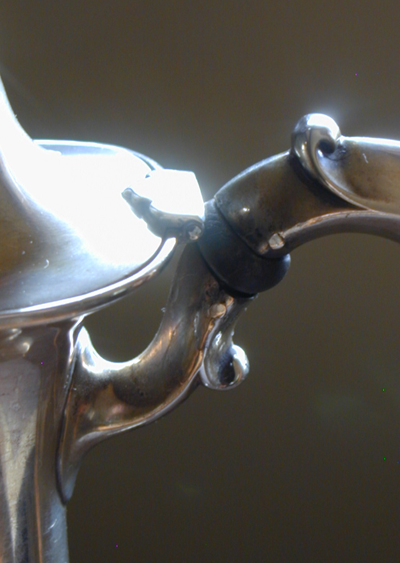
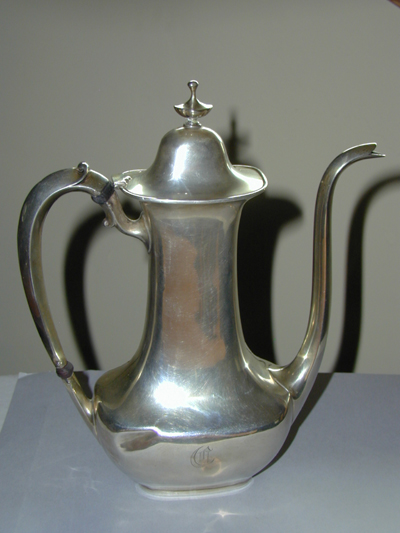
Thank you for that informative reply - I just happened to find the top insulator - figured it out after the description of how to make one - It appears to be wood likely ebony - I have posted some pics - and would like to know if someone might be able to help me date this pot? The marks were all copied to one file and I could not get a pic of the SHREVE CRUMP & LOW CO so i just mis-typed it in similar type style.SHREVE is correct It also has a few dings - a couple fairly deep (see monogram pic) and I was wondering how something like those dings affects value? Should I fix them or leave as is? And I guess I should relate the story as to how I came about this item. I routinely shop in a local thrift shop - went in yesterday and an employee who knows me as a jewelry maker said "I've got something for you. They sold the cups, but since it is broke they threw it away. I dug it out of the dumpster for you, do you want it to melt down or whatever. Free" Like, I said thank you post haste! I'll post again when fixed - Likely have to do a little soldering on the one handle as it is torn through.
IP: Logged |
|
agleopar Posts: 850 |
Your coffee pot was made by Whiting and retailed by Shreve, Crump & Low in Boston. I am only guessing at 1890's, hopefully one of the other forum regulars can answer that better. These forums are not about value but under the circumstances (free is always nice) it seems that the answer to your questions are the same as if we were talking about how to restore silver. Taking dents out is pretty much ok'd by this group except when it is done badly! The same goes for polishing. Soldering the tear will effect the color, hopefully you can control it and or limit it and polish it out after. There are some subtleties to pinning the insulators that I left out ( did not want to put every one to sleep) feel free to get in touch when you get there. IP: Logged |
|
taloncrest Posts: 169 |
I would assume that any Frank M. Whiting piece with your mark would not date any earlier than 1896. IP: Logged |
|
Paul Lemieux Posts: 1801 |
I don't agree with the statement that F. Whiting only used that mark after 1896. Although this is published in references such as Rainwater, I don't know what hard evidence (if any) exists to support it. Personally, I have several Aesthetic Movement F. Whiting pieces with this mark that, to my mind, are unquestionably from the mid-1880s. Shreve, Crump & Low started using the "CO" at the end of their mark in 1888, so the pitcher is certainly not earlier than that. I would guess that the piece is from the 1900-1920 period. IP: Logged |
|
coldair Posts: 18 |
agleopar I actually am to that point and would appreciate any boring details available. Thanks so much for the other replies, it is invaluable to have you experts to help me along. IP: Logged |
|
agleopar Posts: 850 |
If you make the pin a few thou larger than the hole and then taper it so one end is larger and the other is slightly smaller you can then gently drive the pin homeand have it be a friction fit, rather than riviting the ends, The ends can then be trimed, rounded and polished. This makes for a better looking pinning job and means that the pins can be removed without harming them. I find that I usually have to draw down my wire to get the exact size, also they are then hard. Then a quick way to taper it is to put a 1/4" longer pin in the flex shaft and using first a file, briefly, and then emory paper a shallow taper is easy to get. Hope this helps. IP: Logged |
|
coldair Posts: 18 |
Finally have time to post my fix. Been too busy making and selling jewelry to read this forum let alone post to it. I used sterling wire and rivited the ends as I fixed it before reading agleopar's post. IP: Logged |
|
silverhunter Posts: 704 |
My compliments for repairing this one, I think this is a exemple for real silver collectors and lovers that you can repair a lot of things when you take the time for it, and get good information. It's a nice shape and beautiful done, silverhunter! IP: Logged |
All times are ET | next newest topic | next oldest topic |
  |
|
Ultimate Bulletin Board 5.46a
|
1. Public Silver Forums (open Free membership) - anyone with a valid e-mail address may register. Once you have received your Silver Salon Forum password, and then if you abide by the Silver Salon Forum Guidelines, you may start a thread or post a reply in the New Members' Forum. New Members who show a continued willingness to participate, to completely read and abide by the Guidelines will be allowed to post to the Member Public Forums. 2. Private Silver Salon Forums (invitational or $ donation membership) - The Private Silver Salon Forums require registration and special authorization to view, search, start a thread or to post a reply. Special authorization can be obtained in one of several ways: by Invitation; Annual $ Donation; or via Special Limited Membership. For more details click here (under development). 3. Administrative/Special Private Forums (special membership required) - These forums are reserved for special subjects or administrative discussion. These forums are not open to the public and require special authorization to view or post. |
|
copyright © 1993 - 2022
SM Publications
All Rights Reserved. Legal & Privacy Notices |