|

|
|
| How to Post Photos |
REGISTER (click here)
|
|
|
|
| How to Post Photos |
REGISTER (click here)
|

|
 SMP Silver Salon Forums SMP Silver Salon Forums
 American Sterling Silver American Sterling Silver
 more pictures from ONC more pictures from ONC
|
 SSFFriend: Email This Page to Someone! SSFFriend: Email This Page to Someone! |
next newest topic | next oldest topic |
| Author | Topic: more pictures from ONC |
|
middletom Posts: 467 |
  
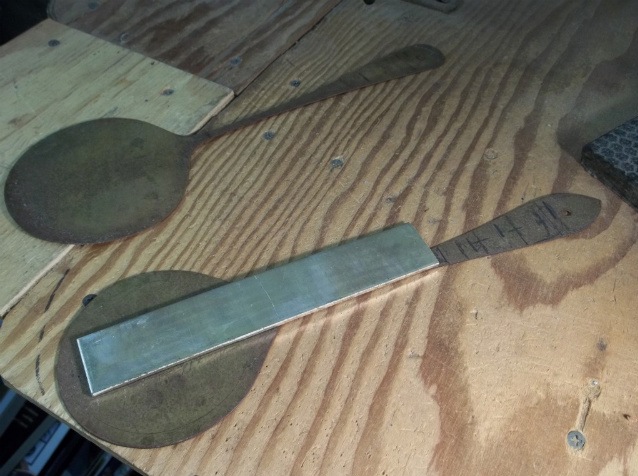
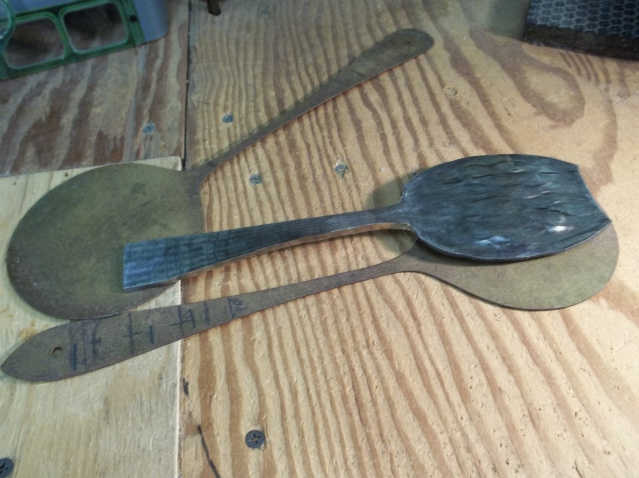
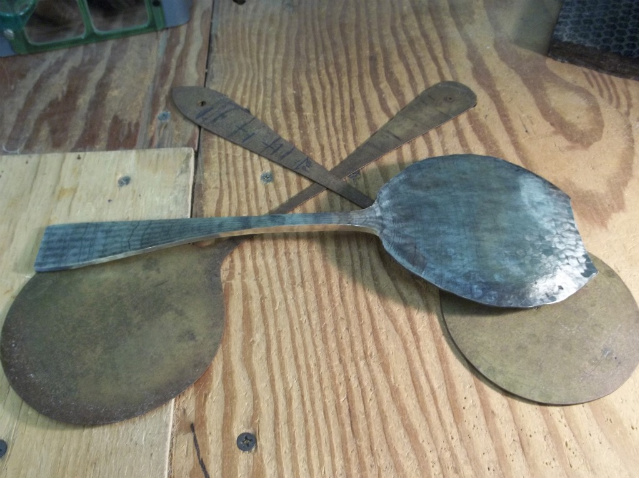
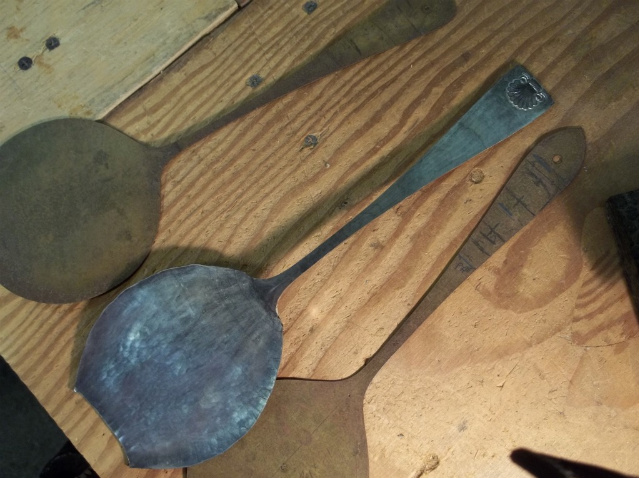
[01-2931] I'm going to post a sequence of pictures of a "Shell serving spoon" in our Windsor Shell pattern. The first picture is the bar of silver with the templates. I have two templates because one has the bowl shape I want and the other has the handle. middletom IP: Logged |
|
middletom Posts: 467 |
This picture shows the piece hammered out about one third the full length. middletom IP: Logged |
|
middletom Posts: 467 |
In this picture, the piece is at the two-thirds point in hammering. middletom IP: Logged |
|
middletom Posts: 467 |
In this picture, I am annealing the entire piece. This is the last annealing for the handle, but the bowl will be annealed more, later. middletom IP: Logged |
|
middletom Posts: 467 |
Here the bowl is forged out to full size and plannished. It will be annealed again. middletom IP: Logged |
|
middletom Posts: 467 |
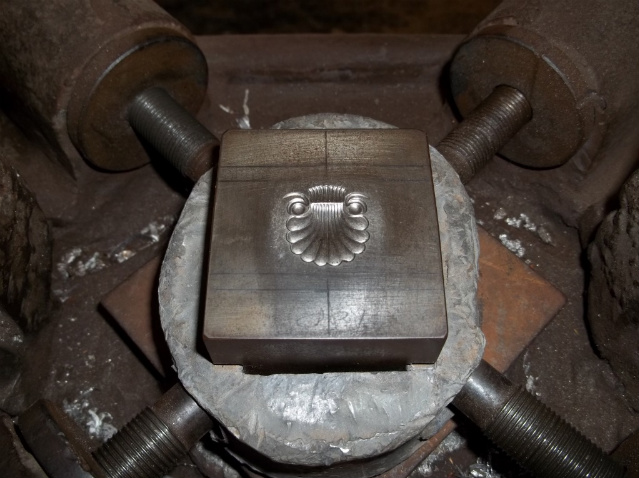
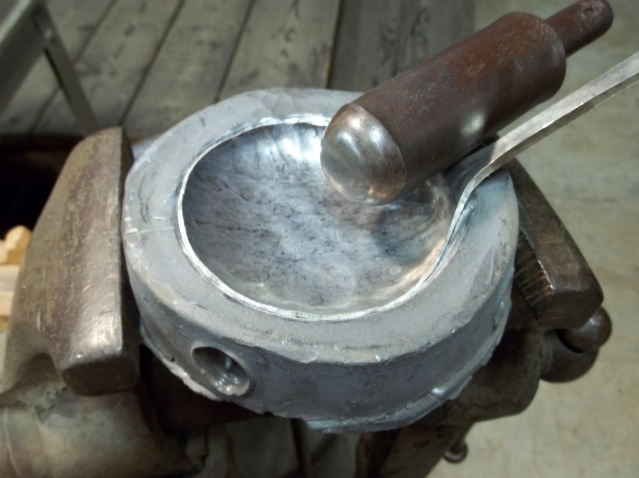
This is the die for the shell design that goes onto the top of the handle. This one is our next to largest die for most large serving pieces short of a punch or soup ladle. The die is being held in a lead ring mounted in the foot drop. For deep, complicated designs we do not hand hammer the silver into he die because of the chance of having a double strike. middletom IP: Logged |
|
middletom Posts: 467 |
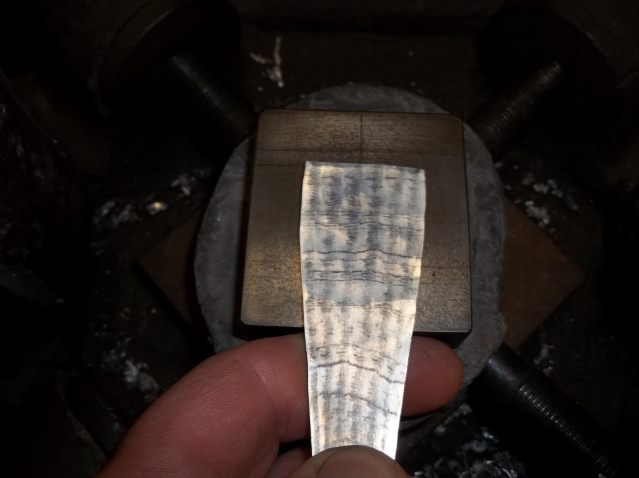
Here the end of the handle is placed over the die design so the silver can be struck into the die. Often, the silver, when being hammered and annealed develops what looks like a wood grain. That disappears with the finishing. Does anyone know why the silver has those lines? A result of the rolling of the silver at the refiner, perhaps? middletom IP: Logged |
|
middletom Posts: 467 |
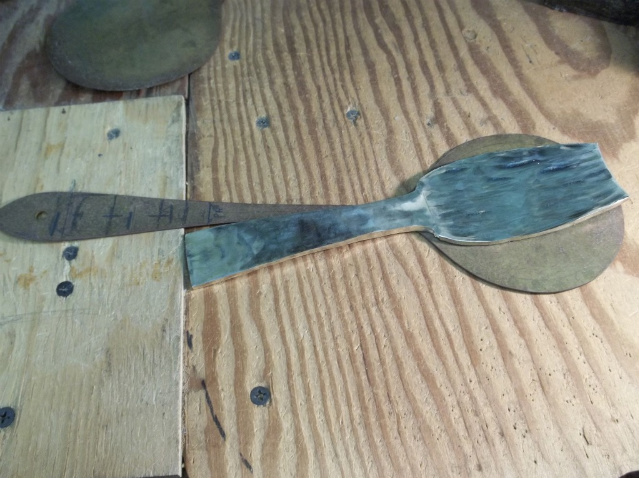
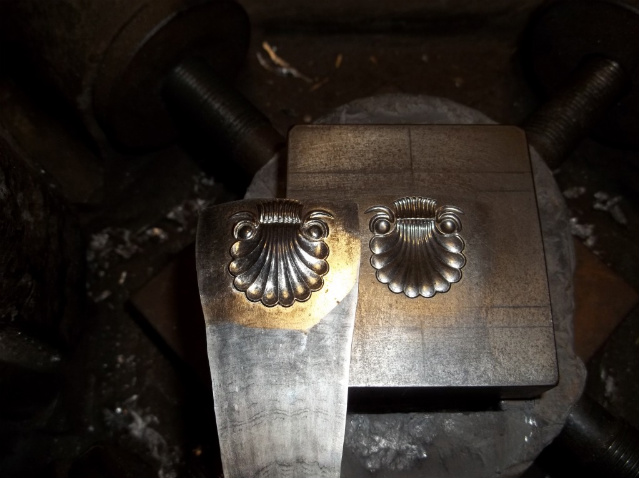
And, so, this is the design after being struck into the silver. It is near bed time so I'll continue this over the next couple days as time allows. middletom IP: Logged |
|
Scott Martin Forum Master Posts: 11520 |
These are terrific  . .Thanks so much. If there are more, please continue to post. IP: Logged |
|
agleopar Posts: 850 |
Hi Tom, am enjoying the very fine images, thank you. I wonder if the "wood grain" comes from the block your forging the spoon on? If it has a slightly etched surface it would transfer to the spoon and possibly show up when you anneal... Or you are right and the refiner has that surface on the rolling mill? It is odd that there would be different bands of firescale? IP: Logged |
|
middletom Posts: 467 |
Thank you for your kind words. Agleopar, the wood grain look is only in the coloring, not physically on the surface. It's aways been a puzzle to us. This picture shows the piece hammered out to full size, with excess silver not yet trimmed. middletom IP: Logged |
|
middletom Posts: 467 |
In this picture, the piece has been trimmed to size and the bowl is being partially shaped by what we call "half-hollowing". I am striking the silver down into a lead form using this steel punch which happens to be the punch for the small cream ladle. This starts the shaping of the bowl because one this large can not be just stuck into the lead with the foot drop. That comes later after the hand working. middletom IP: Logged |
|
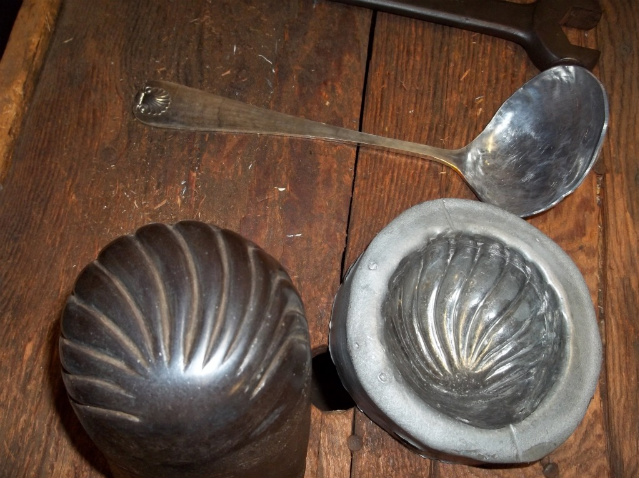
middletom Posts: 467 |
Here we have the steel punch for shaping the bowl of this serving spoon. Note that the flutes are not straight from front to back, but spiral a bit, curving around to the front. Their starting point in the back of the bowl is slightly off-center. With this punch I will strike the silver most of the way to shape in the lead, but the flutes need more defining afterwards. middletom IP: Logged |
|
middletom Posts: 467 |
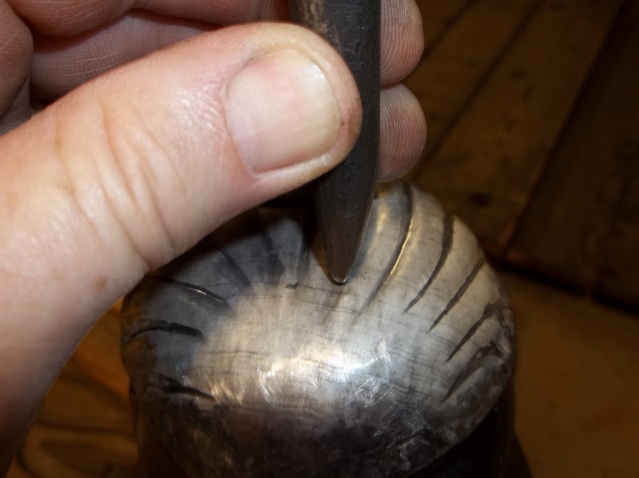
After the bowl has been struck down into the lead, most of the fluteing is set in, but the flutes need to be clarified, so the punch is removed from the drop and set into a vise. The spoon bowl is set over the punch and using a chasing tool, the flutes are hammered down into the flutes of the punch, deepening them and making them more distinct. middletom IP: Logged |
|
middletom Posts: 467 |
In this picture, the bowl shaping and fluting has been finished and the handle has been bent to the desired shape. All that is left is the final filing. middletom IP: Logged |
|
middletom Posts: 467 |
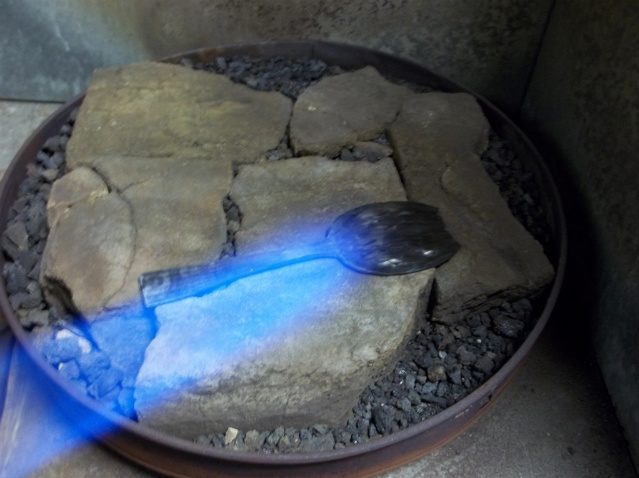
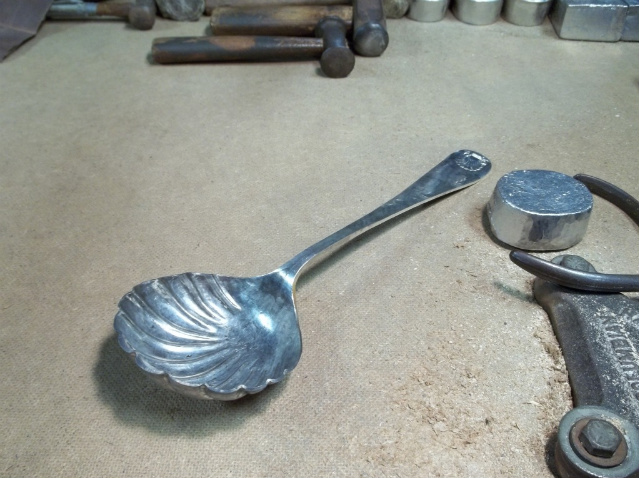
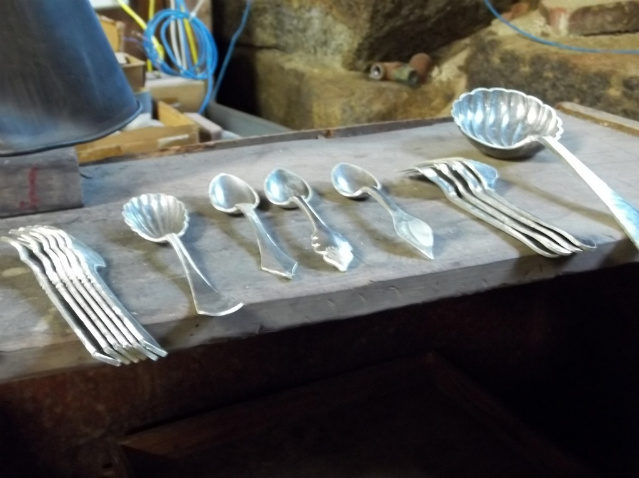
And, here, we have the spoon waiting for the finisher to start his magic. Along side the serving spoon are, from left to right, some Karen pattern salad forks, a Kuroshiwo pattern sugar shell( Kuroshiwo is a pattern designed by Tom Penn), the three tea spoons designed by a woman from California. She is primarily a jewelry designer but Barney's in New York asked her to design some flatware for them and she came to us to get the pieces made. Next are some Windsor Shell salad forks. middletom IP: Logged |
|
chase33 Posts: 362 |
Great pics and nice to see how items are made. Just wondering if you would provide a "timeline" of how long each step takes? Robert IP: Logged |
|
middletom Posts: 467 |
Robert, I don't know that exact figures have ever been kept about the times for a serving piece like this but I'll try to cover the subject. The forging of the piece from bar to full size flat piece takes about 30-35 minutes. Trimming of excess silver takes about five minutes and stamping the back of the handle another four or five. Half-hollowing the bowl requires about ten minutes and setting up the drop and striking the bowl requires about ten minutes more. Placing the bowl of the spoon over the punch and chasing the flutes is more time consuming, perhaps twenty minutes. When the bowl is set over the punch, deepening the flutes is not all that is done. We also have to use a block of lead to hammer the smooth area at the back of the bowl to smooth it and remove any forging marks. Also, the rounded scallops between the flutes have to be hammered down to the punch to assure proper shaping for them. Bending the handle takes another six or seven minutes and filing the bowl to shape and smooth filing afterward requires as much as ten minutes. The final polishing is quite time consuming for the scalloping must be smoothed with the grit and various wheels. That may run to nearly thirty minutes. That is about the best I can lay it out for you. I hope this answers your question. middletom IP: Logged |
|
vathek Posts: 966 |
Middletom: where do the dies you use come from, or who made them? IP: Logged |
|
chase33 Posts: 362 |
Hey Tom Thanks for the response. I must have missed it the day you posted it, so forgive my tardiness in thanking you. Robert IP: Logged |
|
middletom Posts: 467 |
Vathek, The dies, such as the shell designs shown in this series of pictures, are made for us by the Evers company in Providence, RI. They use the EDM method to cut the dies and results in fine detail and finish. middletom IP: Logged |
|
asheland Posts: 935 |
Another great thread! IP: Logged |
All times are ET | next newest topic | next oldest topic |
  |
|
Ultimate Bulletin Board 5.46a
|
1. Public Silver Forums (open Free membership) - anyone with a valid e-mail address may register. Once you have received your Silver Salon Forum password, and then if you abide by the Silver Salon Forum Guidelines, you may start a thread or post a reply in the New Members' Forum. New Members who show a continued willingness to participate, to completely read and abide by the Guidelines will be allowed to post to the Member Public Forums. 2. Private Silver Salon Forums (invitational or $ donation membership) - The Private Silver Salon Forums require registration and special authorization to view, search, start a thread or to post a reply. Special authorization can be obtained in one of several ways: by Invitation; Annual $ Donation; or via Special Limited Membership. For more details click here (under development). 3. Administrative/Special Private Forums (special membership required) - These forums are reserved for special subjects or administrative discussion. These forums are not open to the public and require special authorization to view or post. |
|
copyright © 1993 - 2022
SM Publications
All Rights Reserved. Legal & Privacy Notices |